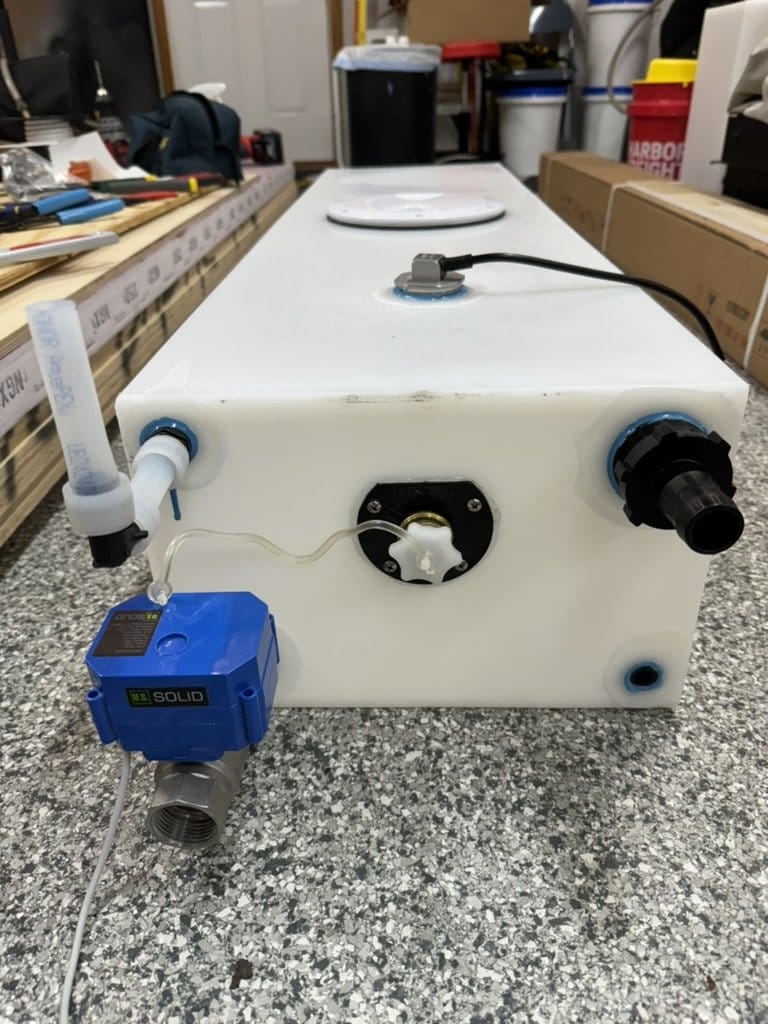
Gray Water Tank

Bought the Northwest Conversions 20 gallon undermount tank. Called them beforehand as the tank dimensions sure seemed like it would fit, but the description clearly says it does not fit with factory running boards. The Trail running boards are mounted using the same factory points as non-Trails from what I know. They said it often does fit, but they like to warn folks and let them decide. Having measured 4 times on the driver side, I took the chance.
So the verdict is it "mostly fits". The nice included SS brackets take up some of the width and it's a lot tighter than I had anticipated. The brackets on the inboard side share the bolts used for the gas tank (the rear 3 straps in my case). The outboard side requires you to place large 3/8" rivnuts near the pinch seam. Each of gas tank straps as they come into the bolt are at odd angles. The SS brackets have nice slots on that side, but in order to use the whole slot, you have to angle grind off a bit of the bracket. Here's one example:

I had to 'nip' all 3 of the brackets, each one with a different angle. Placing the SS bracket underneaththe gas tank strap would still interfere some, but more importantly reduce crucial height for the overall bracket as its tight for the tank already.
In my case, the only interference with the running board bracket is the middle one. And it's pretty darn tight - maybe 1/8" clearance - too close.

Decided to take the bracket off and put it on a diet.


That helped a lot - gave me more play in exact positioning of the tank. Not worried about strength in the least as its the middle bracket and on the driver side so literally nobody ever steps there anyway. The heavy use area is getting in the driver seat and that's on the other side of the front running board bracket.
Next problem with the factory running board is it interferes with the natural position of the middle SS bracket from NW conversions. You can't place the 3/8" rivnut directly across from the gas tank strap bolt as that's exactly where the running board bracket is. Fortunately, after the above trim work, I had just enough play to angle the middle bracket about 10 degrees and place the rivnut about 1 1/4" away - had to bend the bracket just a bit.
Third problem is the SS brackets don't seem to reach the rivnuts all the way without placing a great deal of stress on the tank as you tighten them. I don't know if my brackets are one offs or what, but I definitely needed some sort of spacer as I could see the bottom and sides of the tank bowing as I tightened down and was still quite aways from contact. Don't want to crack the tank, especially in hot weather as things want to expand.
Found some steel 3/8" and 1/4" spacers; just happened to be chrome plated. That and a mix of 3/8" SS washers got things done.

The prep of the tank took awhile. I used Neal Carney's files to have sendcutsend.com create custom SS rings to flatten my water tanks for the inspection hatches. Installed that with an epdm rubber gasket I cut out from a McMaster sheet.
Cut the large hatch hole with a high tpi blade in the jigsaw. The NW Conversions tank walls are just shy of 1/4" thick.

Installed the SS full port version of the common US Solid electric drain valve for fastest possible draining. There's a lot of variation in their valves. Be sure you get one that is 2 wire and normally closed and 'full port'. The control board has a capacitor which stores just enough energy to close the valve on its own once power is cut from the switch. Makes the wiring simple.
Also decided to install the Camco Tornado rotary tank rinser - one on each end. I really don't want to have to disconnect and drop the tank someday.

Next was a Kus level sensor. They have special 'holding tank' versions; same sensor but just with a protection sleeve to keep gunk away from it and avoids sloshing from wailing on it some. The incremental cost for the holding tank version was really minor so I just bought all 3 of my Kus tank sensors that way (the sleeve is removable with a clip for cleaning). Here's a shot installed using the nice hatch.

Here's the final tank all rigged up. Plan to grab a scrap of fiberglass screening and zip tie that over the top of the tank vent pex line. Might make that a little taller. Once the tank was in, I had more room there than I thought. Would help avoid undesirable overflow if tank is almost full and parked at a decent upward angle (e.g. a friend's driveway?)

The other end is closer to the driver - and the Velit heater and its hot exhaust tube. That's about 4"-5" away, but figured a bit of simple AL tape to reduce convection heating of the tank couldn't hurt. Plan to replace the Tornado plastic cap with a metal one.

Tank is now mounted under the van. I wrestled the large, stiff gray water drain hose onto it and ran the electrical wiring to the level sensor and dump valve through the floor of the van (already made those holes earlier during the never-ending-floor phase).
Member discussion